by Tenzin Lhamo
This recipe is for the reconstruction of traditional Tibetan Thanka painting.
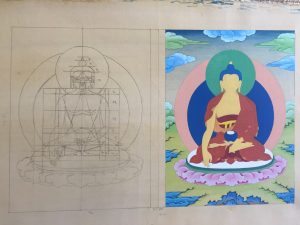
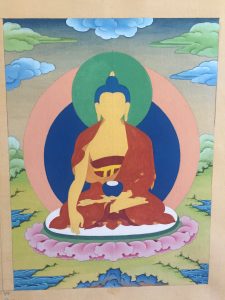
What might the final product look like? The final product might look like a simple canvas painting with a sky view and scenery at the bottom. A seated buddha on a lotus throne will be the only embodiment of enlightened body.
Where is the recipe coming from? What do we know of its source? Its audience? The primary source is local expert Mr. Sonam Wangak, 55 years old, born in Tibet and professionally painted thanka since he was 20 years old. Trained in Tibet, practiced mainly in India and currently he is collaborating with contemporary Tibetan artists on various projects in New York. Our medium of conversation is solely Tibetan and I am translating them in English. 2nd source is the book, Jackson, David and Janice. Tibetan Thangka Painting: Methods and Materials. Boston: Snow Lion, 1988. Print. This book is primarily for the non-tibetans interested in Tibetan thanka painting. Its main research areas are Nepal and India, drawn from some 20 traditional Tibetan painters.
Almost all the materials have multiple varieties and there seems to be no fixed ingredients that should be strictly used. The bulk of the decision is made according to my local experts’ experience and knowledge.
What is the stability of a material over time? Some traditional thankas in Tibet are said to have survived thousands of years, they were usually preserved in strict environmental conditions such as keeping them away from heat and light to protect from discoloration. Most of the time it is displayed on a wall embroidered and covered with plastic wrappings. Moisture and dust are very common detrimental condition which molds the canvas easily and erases the painting over time. So, if the painting is preserved well from these harmful environmental conditions, it is likely to survive for a long time.
Tools & equipment: Thanka making seems to progress in steps that are separate on their own. For the purpose of this project I am planning to follow a simplified categorized steps which is a combination of instructions from both of my sources. For example, tools that I will use in measuring such as ruler, pencil, rubber, and compass will not be used again when I will be at the final step of coloring.
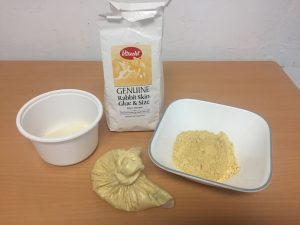
Are there multiple varieties of ingredients? How to decide which was intended? Application and hide glue is one of the most commonly used glue in early Tibet. My local expert advised me to opt for rabbit skin glue for its finely ground quality and weaker smell.
Does the recipe call for purpose-designed equipment or multi-purpose tools? Most of the tools are purpose-designed equipment except tools to be used for measurement are very common tools such as compass, ruler, pencil. But these are also replicas of traditional tools.
How do technological changes impact our interpretation/expectation of the recipes? (e.g., ceramic vs. metal vessels) The major technological change in my project is use of modern geometric tools such as compass and ruler. Traditionally, there were two main types of compass used in Tibet. One was similar to the simple metal compass common nowadays, the other is called a “board compass” used to draw large circles. The pieces were mainly made of wood and they used charcoal crayons as pencil. For lining, the most common tool was a chalk line and leather powder bag which could be stretched like a measuring tape. By using regular ruler, perhaps the recipe might seem more accessible and easier to achieve precision in drawing out the measurement.
Date: 2/26/18
People Involved: Local expert and me Location: home
Environmental Conditions:Normal room temperature.
Time and duration of experiments:Roughly 2 hours, 3- 5pm.
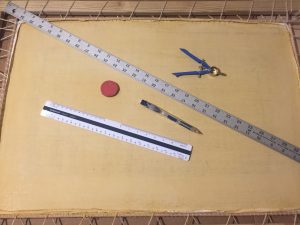
Equipment and tools used:Metal compass, 36 inch ruler, 13 inch ruler, pencil, rubber eraser.
Materials and their source and quantities:This step is solely focusing on the measurement of the actual thanka to be painted. The Jackson book calls it “iconometry” the purpose is to lay down the main lines of orientation. The equipments in measuring are used repeatedly through this step.
Subjective factors, e.g., how things smelled/tasted/looked/felt:The primary linings look pretty messed up.
Prior knowledge that you have: No prior knowledge about how much mathematics is actually involved in cresting a piece of thanka.
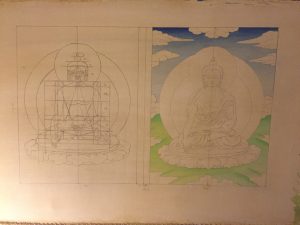
Reflection on your practice: This is the step where I felt most clueless. Even with the local expert to guide me there, I felt that I had no idea of any sort to move on to the next step. My plan changed slightly as compared to the actual plan. The actual plan was to create one big seated buddha but now I am planning to divide the canvas and create two thankas in one frame. My idea is that since this historical reconstruction is about learning and showing what we learnt, it felt apt to have two sides on the canvas, one to depict the ground plan and the other to make the final product. Therefore, my final object will be a combination of the two processes. Later on I realized that in this process, I was merely following what my local expert is telling me to do rather than initiating or deciding myself what to do. The most comprehensive part of the measurement for me was drawing straight lines of vertically and horizontally.
Questions that arise: The questions at this time is when did the use of compass started in Tibet particularly? What was its origin? How were the precision and lining achieved with chalk line and leather powder bag? Although I am using modern metal compass and rulers for this project because the traditional versions are not for sale anymore both in Tibet and outside. Both of my primary sources have no definite answers about the objects originality. In a way it is an incomplete history of science and technology because the focus of the profession and its tradition is geared towards the actual method and steps rather than the origin of the tools. Perhaps, we can say that it is a more intangible science and technology that is overshadowed by the symbolism of the thanka as a sacred religious artifact.
When I asked these questions to my local expert, he said that nobody questioned where the tools came from or who created it first at least during his training period. Everyone followed the rudimentary teachings of what a specific thanka represents and how it should be made with what kind of physical and mental obligations.
Another thing that I found difficult to understand is that, there is a measurement unit called “sor.” When explaining this technique, my local expert seems to retreat in expressing it verbally, his practice is probably that of a tacit knowledge in understanding what is being implied when they talk or write each different measurement of “sor.” It has no equivalent measurement unit in modern mathematics. It is a method to specify the proportional relationships within each parts of the entire figure. For example, it is always 12 units of “sor” whether it is from head to chin or head to toe. The size of the statue does not matter, a unit of 12 “sor” has no absolute value in itself but evens out the main vertical and horizontal lines.
With such difficult concept, the english version of subject is not much of a help. With my local expert, I felt the problem of translation at two levels. At the surface level, there is a doubt of whether everything that he is saying in Tibetan is being translated in english without missing the essence of the meaning. I get lost in finding an equivalent term which could mean the same thing but it seems simply not possible in case of the term “sor.” Than there is his acquired tacit knowledge about the practice which is unable to get transferred to my understanding. Hence, whatever translation I have offered for a term like “sor” is solely my own narrow interpretation and rather than what it actually could mean.
Date: 1/3/18
People Involved: Just me
Location: Home
Environmental Conditions: Normal.
Time and duration of experiments: Roughly 2 hours, 1 – 3pm
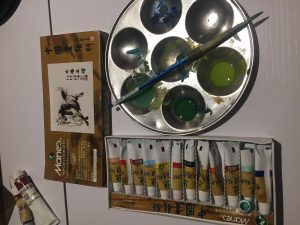
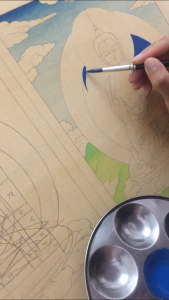
Equipment and tools used: Color mixing tray and a brush.
Materials and their source and quantities: The pigments for coloring the basics of thanka scenery: the sky and the green ground. Colors used only dark blue and light green from the set of Marie’s Chinese water color.
Subjective factors, e.g., how things smelled/tasted/looked/felt: The colors are smooth and easily soluble in water.
Prior knowledge that you have: No prior knowledge about coloring and color mixing.
Reflection on your practice: I tried to do this step in the coloring by myself by referencing the book as my source. The instructions are pretty simple and easy to follow. My local expert recommended me to use this color for few reasons, most impacting factor is it is hard to get the traditional pigments in the market and the closest in quality are Asian pigments such as this Chinese water colors.
Chinese colors are said to be mostly made of natural materials which can be categorized in two classes – plant and vegetable dyes and mineral dyes whereas Western watercolors contain more chemicals. The other main difference is that Chinese colors are believed to be long lasting, which results in a painting not losing its color intensity even after many years.
The main traditional pigments were mineral pigments and the organic dyes. The mineral pigments had to be mixed with a binder before being applied as paints and hide glue was the chief binder. Such paints are used for the initial coats of colors. In Tibet these minerals were extracted from the same deposits in Nyemothang
The use of Chinese water color as a substitution, I tried to color the sky and landscape by using the dark blue and light green which requires only an addition of water. The process is described as a top down coloring with darker and thicker application of the color and then going down to achieve a gradual transition of tone. The book suggested three different ways of preliminary color transitions including one-brush dilution shading, two-brush wet shading and dry shading. I opt to the one-brush shading for its simplicity and also because it felt more daunting to deal with two-brushes without any experience in holding a brush. As a beginner I started with some practice on regular paper and then moved onto the canvas. I think compared to other preliminary shades, mine is rather uneven gradation but the purpose of coloring a dark blue sky and lighter background seems to have achieved. For the green landscape, the procedure is same it brush have to move from taking a thicker portion of color and then spread them out into lighter variations.
Questions that arise: I did not have any particular technical difficulty in this process but I was thinking about the visual presentation of the sky and the landscape in relation to some bigger themes we covered in class such as making of history, nationalization, forms of representation vis-a-vis visualization, and embodiment of a religious figure into a specific symbol of wisdom, faith, and knowledge deliverer or producer. For example, my first question was why are all the enlightened beings such as Buddha are always situated in natural environment such as landscape with flowers and wild animals? How did thanka painting became a traditional and cultural discourse in Tibetan history? What kind of modifications were adopted to represent a particular kind of buddha that is distinctive to the Tibetans? In this case, I am thinking about the length of buddha’s neck. My local expert mentioned that it is aesthetically more beautiful to draw it draw the neck right below the chin and shorter, while he argued some styles have very long necks that seems disproportionate and unappealing to the eyes. I was thinking about the buddha paintings or statues in other buddhist countries such as China, Myanmar, Mongolia, India, and many others. Each have a different image, some have long ears, high bridged nose, lean bodies, and squared faces while some have round faces, short necks, more masculine bodies.The idea of forms of representation here seems to be that each nation have appropriated buddha into an image that in turn represent themselves. The passage of buddhist artifacts and relics through India to Tibet or China to Korea and Japan all adapted to the location and in turn people each according to their needs applied the modifications. In case of the Tibetan depiction perhaps they wanted a shorter neck and rounder face of Buddha to create an embodiment of buddha to which they could relate. Otherwise there is nothing inherently beautiful and ugly as such.
