
Getting Started with EdBlogs@Columbia
- First Steps for Instructors
- How do Students Join?
- Default Roles
- Users Panel
- Your Profile
- Settings
- Adding New Posts
- Adding Tags and Categories
- Editing a Post
- Adding Hyperlinks
- Managing Images
- Managing Media
- Moderating Comments
- Widgets
- Managing Pages
1. Use the Request a Blog form to request your blog.
2. Once activated, you will receive an email with your blog address and further instructions.
3. Access your course blog directly through the provided URL. Use your University Network ID (UNI) and password to log in.
4. Bookmark your course blog so that you may easily access it in the future.
5. Share the URL of your course blog with your students through email, CourseWorks, or preferred method.
1. Visit the course blog by following the link provided by the instructor.
2. Use your University Network ID (UNI) and password to log into the blog. You may need to click on the log in link provided in the sidebar of the site.
3. Once logged in, you should see a “Dashboard.” This is the homepage of the Administrative Panel. See Figure 1.2

Figure 1.2 (Click to enlarge)
4. You are now a member of the course blog and may access it through the login page located on the course web address. *Note: If you don’t know your UNI or password, please contact the CUIT helpdesk at 212 854-1919.
Configuring a Course Blog
Before you invite students to join the course blog, you’ll want to configure your blog with the appropriate settings in the Administrative Panel. The following section will show you how to set up your blog’s User and Settings sections.
Instructors are assigned blog administrator capabilities by default. Blog administrators may set roles for registered students or teaching assistants. Unregistered users that log into the course are assigned subscriber status. The following is a summary of capabilities by role:
- Administrator (Professor default) – Has access to all the administration features
- Editor – Can publish posts, manage posts as well as manage other people’s posts, etc.
- Author (Student default) – Can publish and manage their own posts
- Contributor – Can write and manage their posts but not publish posts
- Subscriber (Non-Registered Guest default) – Can read comments as well as comment
To learn more please consider referencing the WordPress.org Roles and Capabilities table.
The Users section is located in the navigation menu on the left side of the Administrative Panel. This section will enable you to edit student role capabilities and manage your profile information. See Figure 1.3

Figure 1.3 (Click to enlarge)
Users
Change user roles or delete users in the User page. To access this page, click on the “Users” panel from the navigation menu and select “Users” from the drop-down menu that appears.
To remove users or change their roles:
1. Hover over the user name and select “Remove” from the menu that appears. To remove many users at once, check the box to the left of each username and select “Remove” from the “Bulk Actions” drop-down box. See Figure 1.4
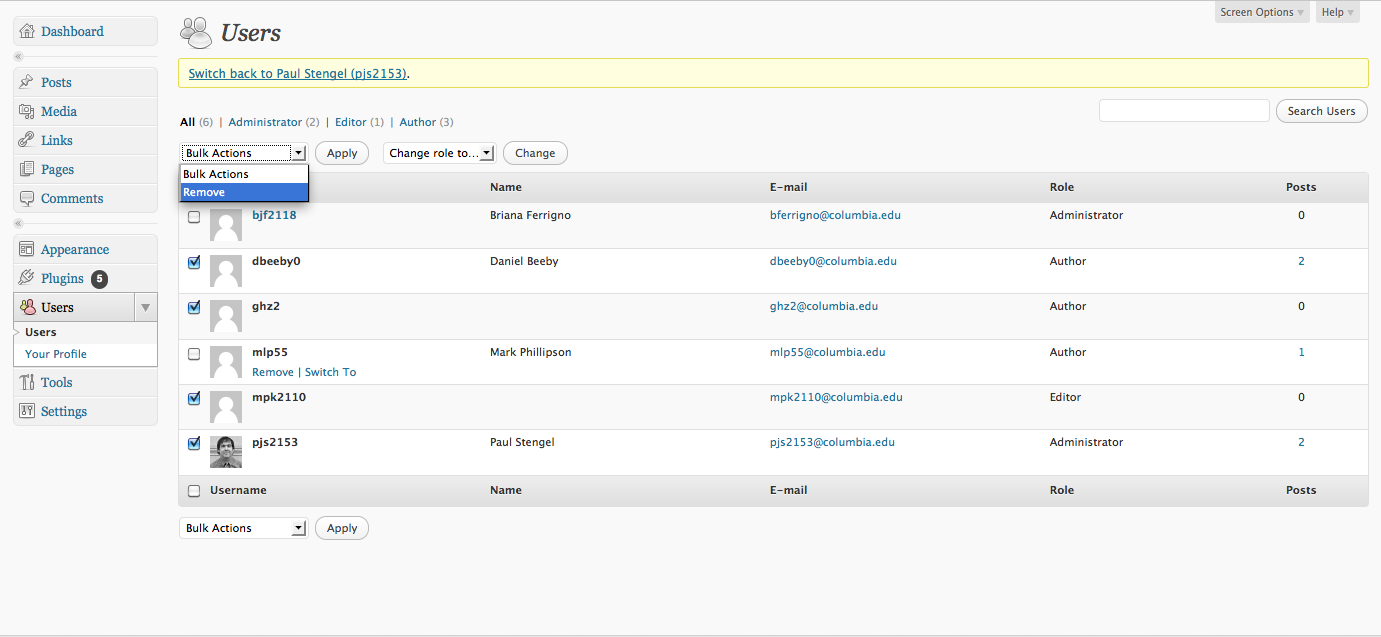
Figure 1.4 (Click to enlarge)
2. Click “Apply.” As students log into the course blog, you may adjust their blog capabilities through assigning roles. To change the role of one or more students,
1. Check the box to the left of their username and choose a new role from the “Change role to…” drop-down box. See figure 1.5
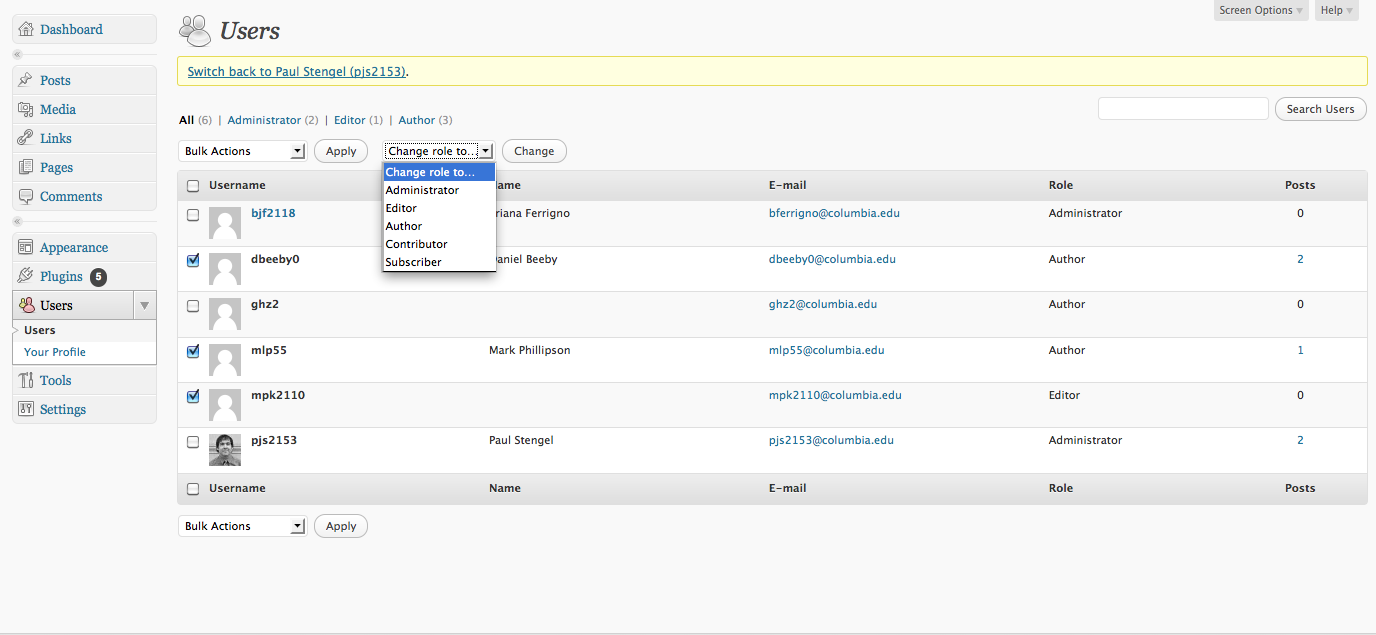
Figure 1.5 (Click to enlarge)
2. Click “Apply.”
1. Click on the “Users” tab in the navigation menu and then click on “Your Profile.” See Figure 1.6

Figure 1.6 (Click to enlarge)
2. Add your name, contact, and optional biographical information in the specified fields. If you would like to change your display name, choose from the drop-down menu in the “Name” section. Your display name will appear next to your posts and comments
3. Click “Update Profile” on the bottom left of the screen.
4. The page will refresh alerting you that the user profile has been updated.
The Settings section allows you to control the structure and function of your course blog. The following settings are the most important for initially configuring your blog. The settings panel is located in the left navigation menu in the Administrative Panel.
Add your blog name and tagline in the General page:
1. Click on “General” under the Settings tab in the navigation menu. See Figure 1.7

Figure 1.7 (Click to enlarge)
2. Add your blog title and tagline in the specified fields
3. Click “Save Changes.”
Change the front page display settings for your blog from the default dynamic recent posts to a static page for displaying a welcome or syllabus page.
1. Click on “Reading” under the Settings tab in the navigation menu. See figure 1.8
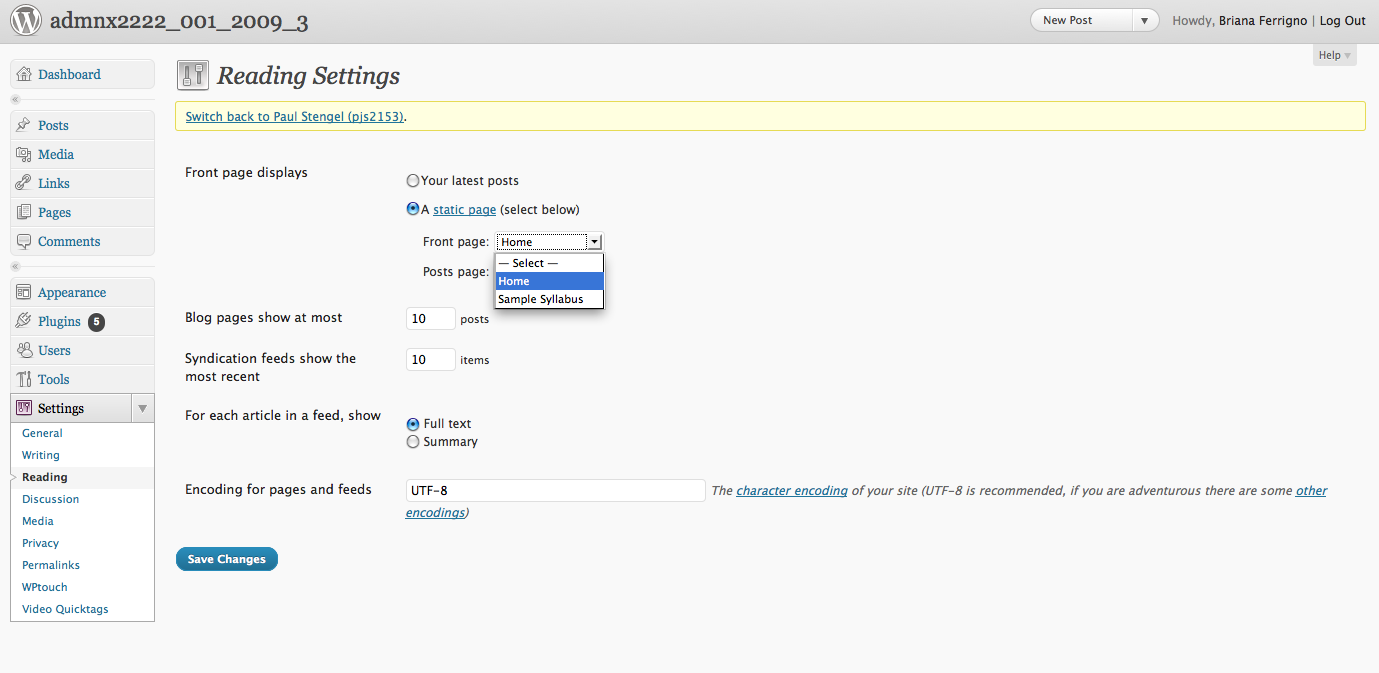
Figure 1.8 (Click to enlarge)
2. Under “Front page displays” click on the radio button “Front page” and choose the page you wish to make the front page from the drop down provided. Remember that you must create a welcome or syllabus page before you may select it from the drop down.
3. Click “Save Changes”.
Manage commenting features through the Discussion Settings. To customize settings:
1. Click on “Discussion” under the Settings tab in the navigation menu.
2. Check the appropriate boxes to configure your blog comments as you prefer. Some boxes are checked by default; these are suggested settings. See Figure 1.9
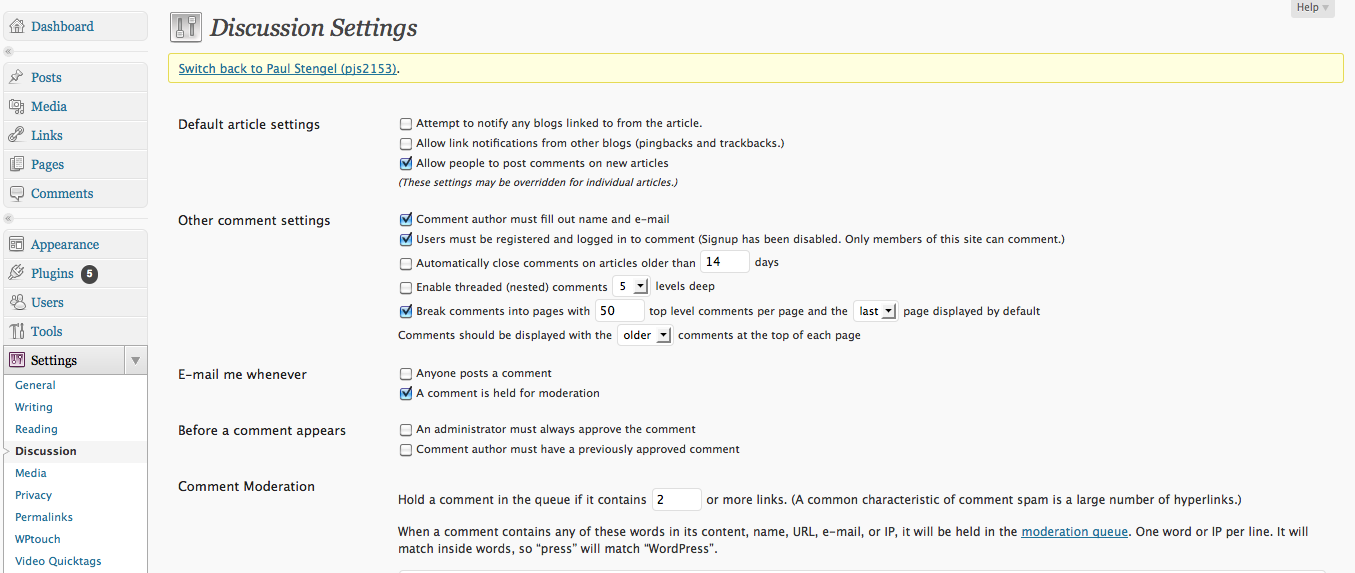
Figure 1.9 (Click to enlarge)
Adjust who may access through the Privacy Settings section:
1. Click on “Privacy” under the Settings tab
2. Click on the button that best meets your course requirements. See Figure 1.10

Figure 1.10 (Click to enlarge)
By default, all course blogs are set to “visible only to registered users…” of the course. Regardless of privacy settings, only users with a UNI may register with your course and become listed users of the blog with role capabilities.
Depending on blog discussion settings, users without a UNI may be able to comment on posts.
3. Click “Save Changes”.
Now your blog is ready for users. At this point, if you have not done so, share your course blog address with your students through email, CourseWorks or preferred method. You may want to include the student login directions located on the first page.
Administration Basics
The following section explains how, depending on role capability, users may manage posts, pages, images, documents, tags and categories, comments, and widgets.
1. Click “Site Admin” to open the Administrative Panel. In the Administrative Panel, click on the Posts tab in the navigation menu on the left and then click on “Add New.” See Figure 2.0
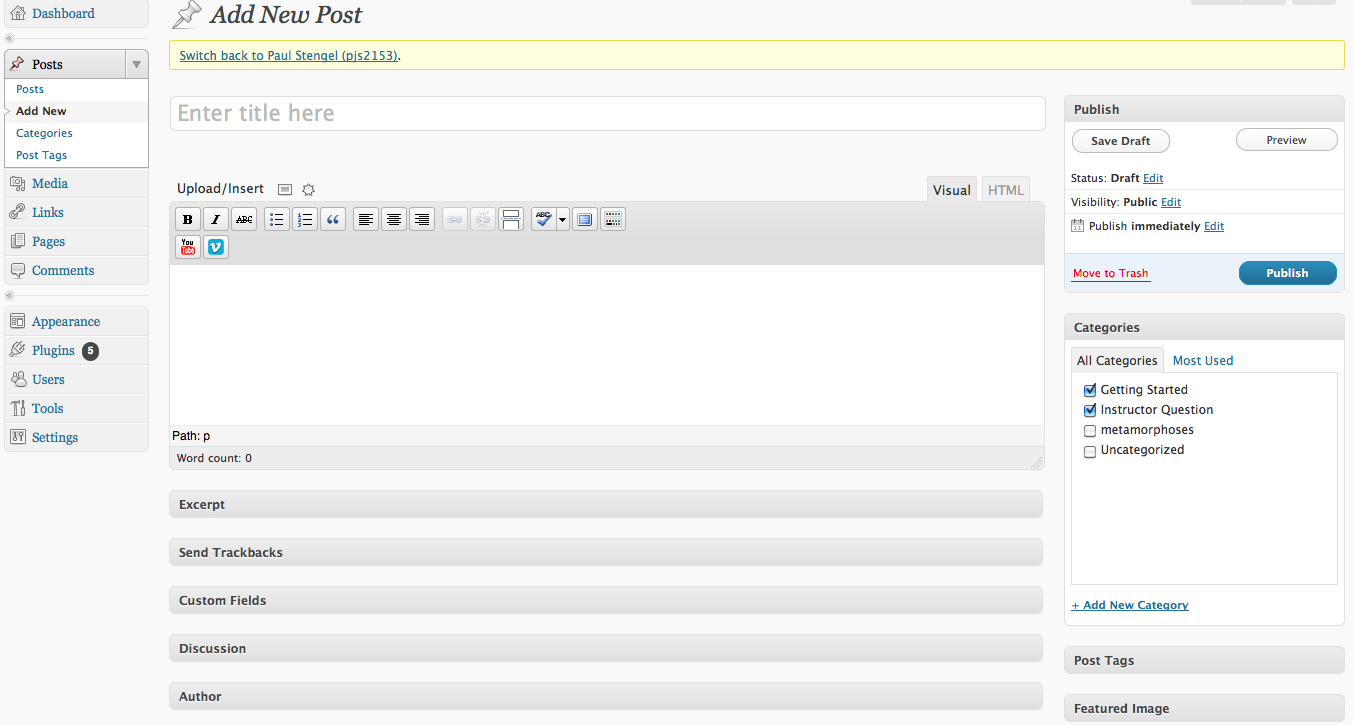
Figure 2.0 (Click to enlarge)
2. Type a title into the first field and then complete your post in the large field with the editing tools provided.
3. Add a tag or category to your post (see following section) in the “Post Tags” and “Categories” boxes at the right.
4. Click “Preview” located in the Publish section at the top right to view your post before publishing it.
5. Click “Save Draft” to save a draft to be published later or click “Publish” to add your post to the blog.
Categories and tags help organize blog posts; categories signal topics or themes that are present in a post, while tags are keywords that group posts together. Assign an existing category or create a new category in the categories panel to the right of the “Edit Post” page. To create a new category, click on “Add New Category” and complete the field provided. Then, click “Add.” To assign one or more previously created categories to a post, check the box next to the category listed. See Figure 2.0 To add a tag, type the keyword into the field provided under “Post Tags.” You may also choose from frequently used tags.
1. Click on “Posts” under the Posts panel in the navigation menu on the left.
2. Select the entry to edit from the list that appears. See Figure 2.1

Figure 2.1 (Click to enlarge)
3. Confirm your changes by selecting “Update” located in the publish section at the top right of the page.
1. Highlight the word(s) you want to link, this activates the hyperlink icon. See figure 2.2

Figure 2.2 (Click to enlarge)
2. Click on the icon located in the editor toolbar.
3. Complete the form provided and click “OK.” Your link may directto another section of the blog or to an external site. See Figure 2.3

Figure 2.3 (Click to enlarge)
4. Your link will appear in the post field. Remember to click on“Publish” or “Save Draft” when you are finished.
Adding Images and Media (documents, video, etc.)
The Media section, accessible from the navigation menu in the Administrative Panel, allows you to add images, documents, and video to the course blog. There are two ways to add media; you may upload images, video, and text to your Media Library and insert it into your blog, or link/embed your media from a third party source such as Google or YouTube. Due to space constraints, we recommend linking and embedding media whenever possible. Please note each course blog is limited to 50MB of file space. This effects the amount of total files users may upload to a course blog from a computer. Post text, links, and media embedded from third party sites are not counted in the space limit.
1. To insert an image into a post or page, create a new post/page or select the post/page in which you would like to insert an image.
2. Above the editing toolbar, click on the square icon to the right of “Upload/Insert”. See figure 2.4
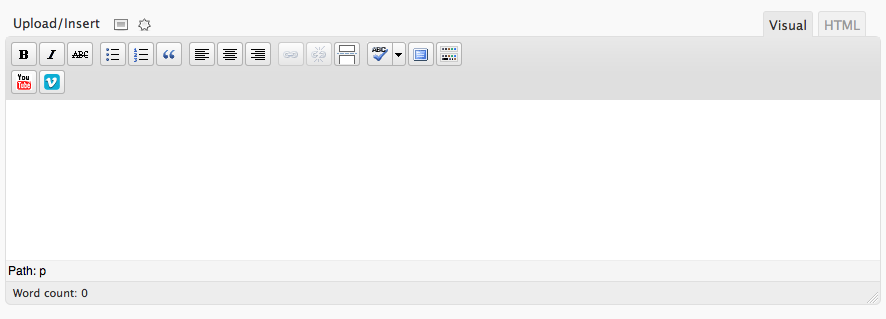
Figure 2.4 (Click to enlarge)
3. The “Add an Image” interface will pop up. Click on From Computer to upload an image (limited to 1MB). Click on From URL to insert an image that comes from another site, such as Google images. See figure 2.5.

Figure 2.5 (Click to enlarge)
You may also choose an image from those you previously uploaded, by clicking on Media Library.
4. When finished completing all fields, remember to click “Insert into Post”. This will insert the image into the post and wrap text around the image, if you like. If you want to simply link to an image, use the Add Media button instead.
1. Create a new post/page or select the post/page in which you would like to add media.
2. Above the editing toolbar, click on the sunburst icon to the right of “Upload/Insert”. See figure 2.4
3. The “Add Media” interface will pop up. Click on From Computer to upload media (limited to 1MB). Currently acceptable media types for upload are: jpg, jpeg, png, gif, mp3, pdf, doc, docx, dot, dotx, celtx, xmind, PDF, xltx, xls, xlsx, pps, ppt, pot, potx, pptx. Click on “From URL” to insert media that come from another site, such as a .pdf from a website.
4. When finished completing all fields, remember to click “Insert into Post”. This will insert a link to the location the media is stored on your course site, or an external site you entered under the “From URL” tab. If you want an image to be inserted into the post and wrap text around the image you should add the image using the direction for Adding Images, above.
Adding Media to Your Media Library
1. Click on Media from the navigation menu at the left.
2. In the drop-down menu that appears, click on “Add New.”
3. Click on the “Select Files,” button and choose the files from your computer to upload. Then, click “Select.”
4. Each media resource has a unique URL that may be linked to in a post. You may manage information related to a media resource as well as access the resource URL by clicking on edit under the resource thumbnail.
Posts may be read and commented on through the blog page view.
1. Click the title of the post to be brought to the unique post page.
2. Then scroll down to the bottom of the post, where it says “Leave a Reply,” and complete the required fields. See figure 2.6 Then click “Post Comment.”

Figure 2.6 (Click to enlarge)
3. Depending on the blog settings, you may need to be signed into EdBlogs to comment.
Comment moderation settings may be adjusted through the discussion settings panel. See figure 1.9.
You may access all comments by logging into the Administrative Panel and clicking on the Comments Panel in the navigation menu. See figure 2.7
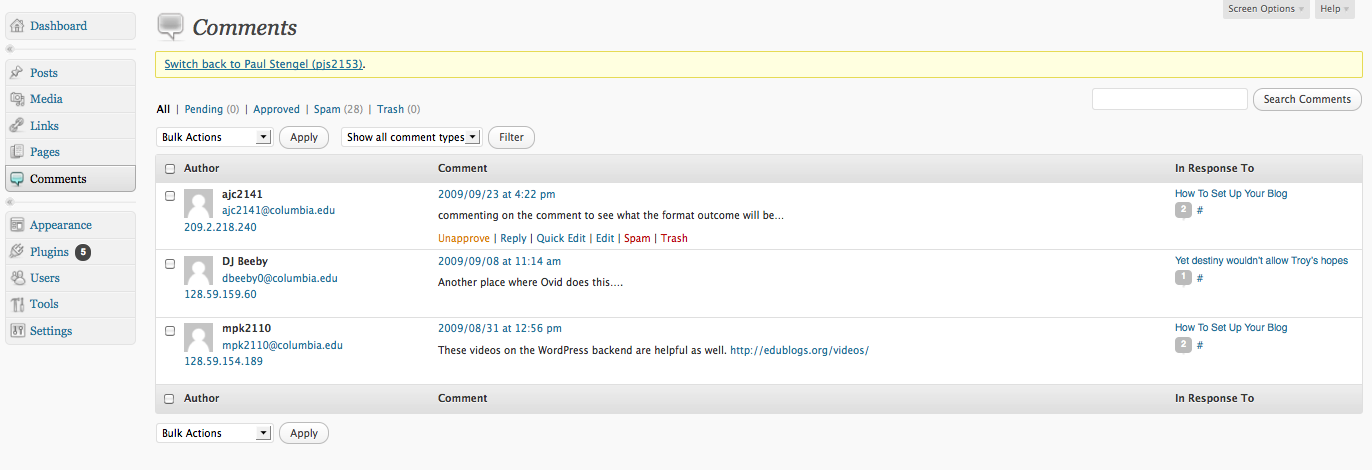
Figure 2.7 (Click to enlarge)
Here you may read and mark all comments pending, approved, and spam. You may also delete and reply to comments.
Widgets provide a simple way to arrange various elements of your blog sidebar. The following concepts should get you started with widgets. The default Course Theme is structured with two sidebars (primary an secondary, as well as four footer widgets and and a body for content. The blog view has left and right sidebars that contain content that may be controlled by activating and moving widgets around in the Administrative Panel.
In Figure 2.8 there are three widgets in the left sidebar (Participants, Recent Posts, Recent Comments) and four widgets in the right sidebar (Archives, Categories, Tag Cloud, Quick Links). There are no widgets in the footer area. This is the suggested default widget arrangement for a new blog.
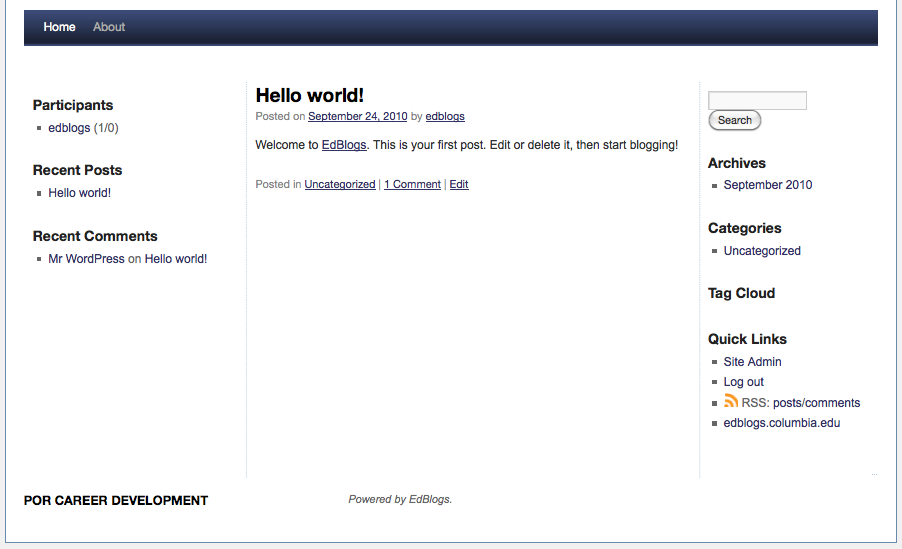
Figure 2.8 (Click to enlarge)
A blog administrator may manage widgets through the Administrative Panel:
1. Log into the Administrative Panel.
2. Click “Appearance” in the navigation menu and then click on “Widgets.” See Figure 2.9
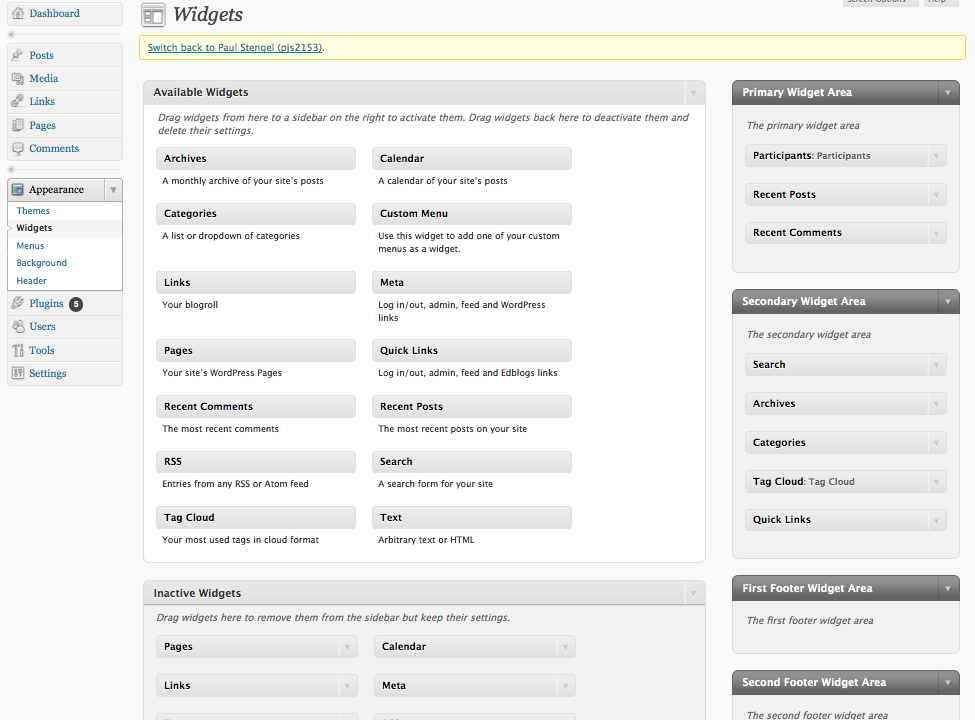
Figure 2.9 (Click to enlarge)
3. Click, drag, and arrange the widgets you wish to display in the Primary, Secondary, or Footer Widget Areas. Available widgets and Widget Areas will vary for each theme. Note: often, when you switch themes, you lose your widget settings.
4. Complete any settings required by each widget and click “Save.” Verify that the widgets have appeared correctly by switching to the blog view. Click “Visit Site” next to the title of the blog to view your changes.
Unlike Posts, pages are not designed for timely information. They are static and do not cycle through the blog. They also cannot be associated with categories or assigned tags.
Pages allow for comments and the process to edit a page is similar to a post. When you create a page using the default Course theme, the page name appears as a link under the blog title. Notice the page names “Close Reading”, “Course Requirements”, “Schedule of Readings”, and “Texts” in Figure 3.0
Figure 3.0 (Click to enlarge)
To Manage Pages
1. Log into the Administrative Panel.
2. Click “Pages” in the navigation menu and then click “Add new.” See figure 3.1
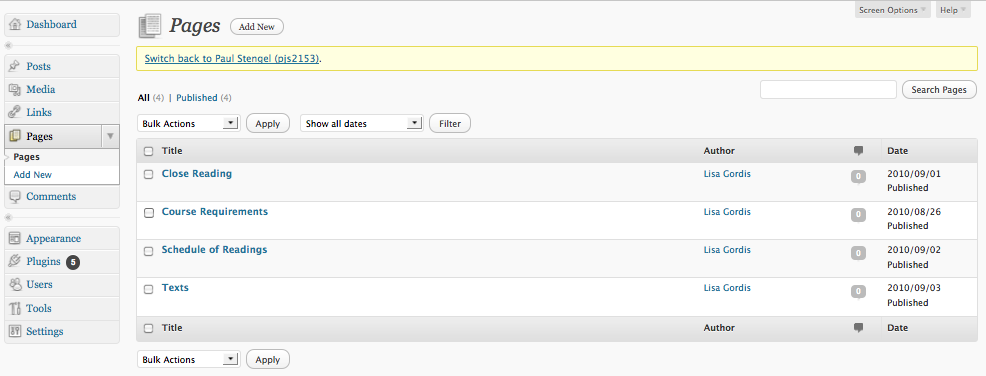
Figure 3.1 (Click to enlarge)
For More Information
For an individual consultation on EdBlogs, or to learn more about EdBlogs features, please contact the Columbia Center for Teaching and Learning: (CTL)
Phone: 212 854-9058
Email: ColumbiaCTL@columbia.edu